Tag Archives: paint

Our Craft Sheet

sheet1

Those who have been reading Magical Childhood for a while know that I often recommend sheet painting.  It’s even one of the first crafts I put up on the original Magical Childhood site.

We have been using an old white bed sheet for crafts and sheet painting for over a dozen years now. 

sh9

In the summer time, we hang it on the clothes line and the kids use paint to decorate it. 

sh6

Sometimes we put it on the ground and they decorate it with their feet. 

sh2

Sometimes it’s washable paint, sometimes not. 

sh10

The sheet looks different every year and every project. 

sh7

In the winter time and on rainy days, the sheet is our art tablecloth.  It doesn’t matter how messy or staining an activity is, because if it stains the craft sheet it just adds more character and another memory. 

sh3

I love my craft sheet and it makes me smile every time I spread it on the table or hang it on the line for another round of staining. 

sh4

It’s so amazing to look at little one year old Fiona using it now and remembering when her teenage sisters were making those stains. 

sh5

You can use any old flat bed sheet for an art cloth or pick one up for a dollar or two from a thrift store. 

I highly recommend starting your own. 

You’ll never find another bunch of stains to make you smile more.  🙂

sh8


9 Comments

Filed under crafts, happy stuff

Altered Artwork!

Here’s a fun project to do for your next art adventure.  Alter some artwork!  Twisted Sifter posted the altered thrift store masterpieces by artists Chris McMahon and Thryza Segal, and the results are so fun! 

You can generally pick up oil and acrylic paintings at thrift stores for next to nothing, and then assign the kids the task of adding in a magical creature or two. 


My late father was an artist and he often bought thrift store paintings and just painted over them completely since it was much cheaper than buying new canvases.  I’ve planned for a long time to take some paintings and have the kids just add on to them, but I like this idea even better.  We recently bought a bucketload of framed art and pictures for Victoria’s photography, and now I think we need to go back and get another stash for this project. 

Fun!


Leave a comment

Filed under crafts, neat stuff elsewhere

Easy Puffy Paint!

I’ve seen recipes for homemade puffy paint many times over the years, but I never took the time to make it with the kids until today.

What a shame I waited this long!

The kids had a blast and developed lots of ways to use it.

Even Harry Potter crests and pendants!


The original instructions were to mix one tablespoon self-rising flour, one tablespoon salt, food coloring and enough water to make a paste, once for each color.

Since I made up little cups for four different children (life is too short to listen to “Mom, Alex mixed all the colors into brown!” and “Hey!  Victoria used all the red up!” all day!), I soon realized that it made much more sense to just mix up:

  • One part self rising flour
  • One part salt
  • Enough water to make a paste

and THEN divide it into muffin tins or ice cube trays and add food coloring!

Either way, all you do is give the kids Q-tips or paint brushes and instruct them to dab it on cardboard.

We used recycled Priority Mail boxes for our canvases, cut into small squares.  You want a nice sturdy canvas.

When the picture is finished, microwave it for about 10 seconds (we did 5 second intervals and occasionally needed longer for really thick and wet paintings).

All four kids had a blast using this stuff and they used it off and on the whole day and into the night.

28 Comments

Filed under crafts

Rolling, Rolling, Rolling…

We painted our bathroom recently, and when I was finished with the mini paint roller I knew just what I wanted to do with it.


Crafts!


We coated some cardboard with aluminum foil and made palettes, and then I squirted various colors of tempera paint for the kids to roll — sometimes onto paper plates and sometimes right onto the “canvas.”


Alex loved it.  There was color mixing, mushing, and plain old messy fun.

Jack and Anna loved it too, especially with Q-tips to draw on the palettes.

Jack even took the opportunity to practice his cursive, tracing and copying his name after I wrote it out for him.

I highly recommend it!  Even if you don’t paint your bathroom first.  🙂

Happy weekend!


2 Comments

Filed under crafts

Easy Craft: Make Paint With Water Pages!

(Art by Victoria)

Here’s a super simple craft that’s fun for all ages.  Make paint with water pages!

Here’s how:

  1. Draw a picture with a permanent pen or dark crayon.  If you like, you can draw it in pencil first and then go over it with a dark permanent marker.
  2. Fill in sections of the picture with dots, lines, cross hatches or other designs with watercolor pencils.  Alternately, draw a line inside the marker lines with watercolor crayons (watercolor crayons are bolder and don’t require as much of a pattern to spread the color).  You don’t need to color the entire sections in — just a pattern or lines are fine.
  3. Paint each section with a wet paintbrush to reveal the color.

Note:  This is an example of “you get what you pay for.”  Cheap watercolor pencils are rather pitiful for this so if you get a chance to pay a couple of extra dollars for nicer ones then I’d recommend it!

You can tell in the art above which sections were drawn with the cheaper pencils and didn’t blend as well (like the stems and leaves), as opposed to the ones that turned into vivid paint (like the flower center and the pink petals).  All of the sections were basically colored in the same with just cross hatches, and good pencils will blend and disperse so the pattern virtually disappears.

You can find watercolor pencils and watercolor crayons (which are great fun!) at craft stores like Michael’s (look for 40% off coupons online to help cut the cost).

For younger kids, do the art up for them (write their names in big block letters, make flowers, etc.) and then do the patterns for them or have them color inside to make the patterns.  Then give them the paintbrushes and water so they can magically paint while you’re cooking supper or otherwise otherwise occupied nearby.

Happy Friday!

Leave a comment

Filed under crafts

Craft Sampling: Pop Bottle Paint Prints

I saw this craft all over the internet this month and something about it appealed to me.

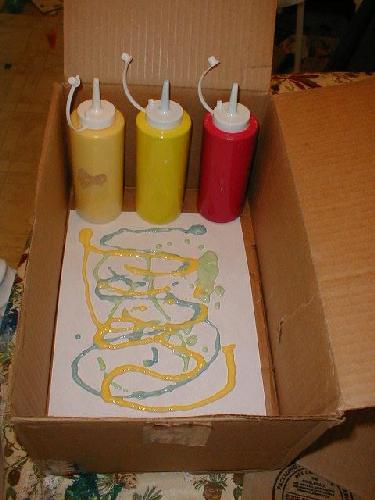
The idea is simple enough — use a plastic pop bottle to stamp flowers in paint.  The bottom makes the flower and the lid makes the center.

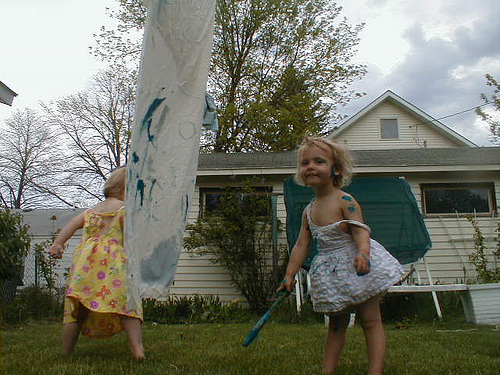
I had the kids bring the paints out to the picnic table, grabbed some pop bottles from the recycling bin, assembled some paper and gathered all of the kids (plus an extra adorable toddler, courtesy of the neighbors).

And… it was a bit of a bust.

We are an art-loving family and crafts tend to go for hours, but this one just didn’t do it.

Annalee made one picture and announced she was going to bicycle to a friend’s house.  Jack did two and asked if he could be done.  Asked if he could be done!!!!  Now THAT’s a first at our house.

Even Victoria only made 2 or 3 before moving on to other activities.

And our neighbor’s tot… she only wanted to watch.

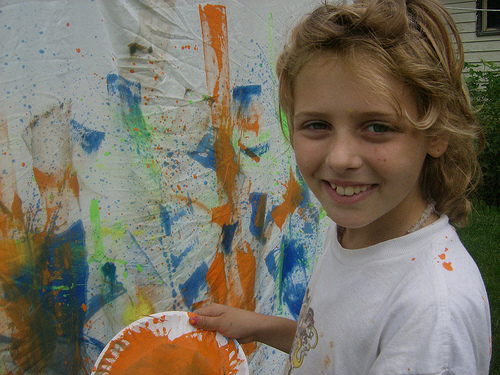
Only Alex spent more than a few minutes on it, and that was because I let him make glorious messes mixing paint colors on his paper plate with the bottom of his bottle.

Some elderly neighbors stopped by to check out our craft and they thought it looked darling.  I had thought it looked darling too, but it shows what grown-ups know.

I usually know better, but I was sucked in by those cute little flower prints.

I think the main reasons it was such a dud here were that:

1.  There was no real room for personal creativity. It is the classic “Here’s what you do and here’s what you do it with and here’s how it should look” craft.

2.  There was little sensory pleasure to it.

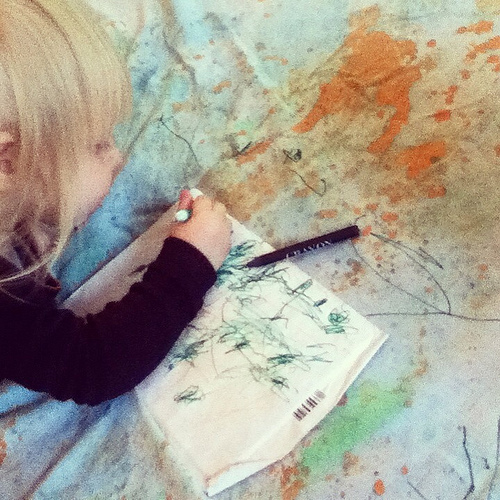
Part of the fun of art for little ones is tactile. Sometimes that means literally getting their hands into gloopy, slippery, silky, squishy or otherwise fun stuff. Sometimes it’s sensory in another way though.  There is something very satisfying in pounding a golf tee into a block of styrofoam or a leftover Halloween pumpkin.  There is an inherent fun factor in squeezing beeswax and clay and homemade playdough and mud balls.  There is a fantastic smoosh and thwack when we stamp with sponges and other squishy things…

But pop bottles are hard.  They don’t squish or thwack or give or slide or anything really.  Even I noticed it as I tried my hand.  There was no FUN to it.

Perhaps we’re craft snobs.  Maybe we’re spoiled.  Maybe we were just particularly scatterbrained and hard to please that day.  But it’s a craft I’m checking off my list.

Luckily, there’s still several thousand left on my list to try tomorrow.  🙂

Any suggestions?  I’m always open to trying several thousand and one!

1 Comment

Filed under crafts

Why I Love Teacher Tom

I’ve been following Teacher Tom’s blog for a little while now.  Teacher Tom is a preschool teacher who gives me all sorts of wonderful ideas, especially for making outside spaces child-friendly.  He also just has a wonderful love of children that I enjoy reading.

But today’s post on his blog perfectly sums up why I adore him.

He was inspired by these blocks (so am I!) and decided to try to make some with his students.

Now anybody who’s been around the internet block a time or two knows that when most folks are inspired by projects for children online, they try to recreate them to absolute perfection, and then document the steps in 25 photoshopped, frame-worthy pictures.  The final result usually belongs in a high end Etsy shop or an art gallery.

It also tends to look like it requires so much trouble, so much artistic skill, so many expensive supplies and so much time that I just forget about it and get out the playdough.

This is how Teacher Tom recreated the project with his kids.

And more.  Glorious messes galore.

And the final bit, that made me smile like mad?  Just as I was thinking “I wonder what special paint he used and if he’s coating it with varnish,” he mentioned it was plain old tempera paint… and it rained that night and it probably all washed off so “I guess we’ll just have to do it again.”

And you know what, I’ve done THAT craft!  The kids do love it.  We did it on big rocks and cement border stones, but they had a blast (me too, actually!).  And it did wash off, and we did do it again.

I have scrap wood in the back yard and I have lots of tempera paint.  I know some kiddos who would love to make that pile into some fabulous, tacky, gloppy, beautiful, colorful, perfect blocks.

Thank you, Teacher Tom, for crafting for the kids.

5 Comments

Filed under neat stuff elsewhere

Watercolor Snowballs

I know those of you in sunshine states are sick of hearing about snow, but when you have this much of it you tend to find a lot of uses for it!  Here’s what we did today…

Just go grab a pan of snow, pack it up into some snowballs and paint!  Store them in a bucket in the freezer or outside and then go have the most colorful snowball fight ever.  I recommend aiming for trees and houses, as frozen snowballs can get pretty solid.

Or you could have so much fun painting them that you let the rest all melt.

Guess we’ll have to do the snowball fight part tomorrow.  🙂

1 Comment

Filed under crafts

Tissue Paper Resist Prints

Do you have any bleeding tissue paper?  Then you must head over to the Frugal Family Blog and check out this easy craft idea.  She’s so clever!

heartresist1


1 Comment

Filed under crafts

Squirt Painting!

Here’s a fun craft using stuff you probably already have in your cupboards.

You need:

~ flour
~ water
~ food coloring
~ 2 or more squirt bottles such as bottles from syrup, glue, ketchup or mustard
~ paper
~ bowl and spoon
~ disposable cardboard box (optional)

1.  Mix some flour with enough water to make a thick paint-like consistency.  Mix in a few drops of food coloring and pour it into a squirt bottle.  Repeat for as many colors as you’d like.  We do three.

2.  Place a piece of paper at the bottom of your cardboard box.  The box will keep the mess contained.  If you like, you can cut off the flaps or cut down the size to make it work best.  Or you can skip this step and do the craft outside or over a safe surface.  Remember that food coloring can stain, so if this is a problem you may want to tint the flour/water with washable paint instead.

3.  Now let your kiddos drizzle, draw and squirt to their heart’s content!

We consider this kind of art “camera art”– meaning it is too messy to keep forever so we take a picture of each creation and drop the finished creations right into a bag to dispose of. We save out one or two of the best to display all day, though.


ALTERNATE CRAFT:
Another option that’s great for little ones is to do the craft in a baking dish and squirt right into the dish.  Kids can draw with their fingers in the goop and then you can rinse in the sink and start again.

This can even be done straight onto driveways or patios. Toddlers will enjoy it with just flour and water in a single bottle. Best of all, it’s so cheap and easy they can do it again and again.

Note: Squirt paint won’t be tasty but it is non-toxic (unless you mix in paint).  For babes who eat a lot of their art supplies, you can also make it with baby cereal or pureed fruits or veggies and water.  Sneaky, huh?  😉


5 Comments

Filed under Uncategorized