Tag Archives: easy crafts

Make a Simple Terrarium!


Here’s a super simple way to bring a little bit of nature indoors and teach kids a bit about ecosystems.  Make a terrarium out of a jar from the recycling bin (we used a salsa jar) and a bit of moss and tiny plants from a shady area of your yard or nearby natural area.

This project is from the August 2019 issue of Wild Kids Magazine, a free printable nature magazine I put out for kids and their grown ups.

Fiona’s terrarium lived happily on our piano for nearly a year before it had withered enough to consign it to the compost pile and recycling bin.  Don’t forget to mist it occasionally if it seems to be drying out a bit, and it can last much longer.

Have fun!


Leave a comment

Filed under crafts

Beluga Whale Fun

I happened upon a pretty incredible video that you have to see to believe today — a beluga whale playing fetch!

Now if that doesn’t make you smile, I don’t know what will.  🙂

I had to share it, and figured I might as well see if I could find some fun stuff about beluga whales for kids to go along with it.  So….

Here are a few facts about beluga whales for the kids…

  • Beluga whales are also called white whales.
  • They are one of the smallest species of whales.  Even so, they can still reach 2,000 to 3,000 pounds and 13-20 feet long.
  • Beluga whales are mammals, like us.
  • Like us, they are very social and like to be around others.  They live in small communities called pods.
  • Belugas eat fish, crustaceans and worms.
  • They live mostly in the Arctic.
  • Belugas like to talk and are nicknamed “sea canaries” because they are so vocal. They talk to each other with clicks, clangs and whistles, and can also imitate other sounds they hear.
  • Belugas love to play!  There are lots of reports of them swimming alongside boats and of playing with objects they find in the water, both in the wild and in captivity.
  • They are endangered.  They need our help keeping the oceans safe to keep them safe.

And here are some fun crafts about beluga whales

OFLC MOPS has this fun marshmallow beluga craft and some links.


All Kids has a darling sock whale craft.

Leenawee Great Start has a fun and simple Baby Beluga painting project.

The Iowa Farmer’s Wife has a darling paper bag beluga.

The Joy of Sharing has a sweet paper plate beluga craft.

Learn Create Love has a great beluga printable with some more info.

And lastly, thechristinejuang has a free tutorial to make these adorable stuffed belugas.

Have fun!

Leave a comment

Filed under crafts, happy stuff

Making Mushroom Spore Prints!

Have you and your kiddos ever made spore prints?  It’s easy to do and so fun — not to mention a bit educational!

Spore prints! A Magical Childhood

Miss Fiona and I made some spore prints this month from wild mushrooms that big sister Rhiannon (Anna to you old time readers) found while hiking in the woods with our dog, Moose.  The oyster mushrooms made white spore prints that looked beautiful on black construction paper, while the mysterious others (tentatively identified by hubby but I forgot what he thought they were) gave us some brown and grayish ones. 

Spore prints from other mushrooms can be green, pink and more!

Mushroom hunters use spore prints to identify mushrooms, but they’re also just really fun to make.

I put instructions on how to make them in this month’s Wild Kids Magazine, a free nature magazine that I’ve been putting out this year.  You can read it and find out more about spore prints there.  Make sure to talk to kids about mushroom safety, and wash hands afterwards.

Have a magical week!

Leave a comment

Filed under crafts

Oodles of Nutcracker Kids’ Crafts!

nutcracker-kids-crafts

Miss Fiona and her daddy have a tradition this time of year of watching The Nutcracker and reading picture books about nutcrackers.  Daryl also has a collection of nutcrackers that the kids love to play with.

Last week, Fiona asked me if she could spend her money on a nutcracker for daddy.  The nutcracker in question was overpriced and badly made, so I offered to help her make him a nutcracker instead.  She loved the idea and I was on the hunt for some fun and easy nutcracker crafts.

Here are the best that I found, in case your kiddos would like to make some nutcrackers of their own.

Sophie World has this easy printable nutcracker that kids color and then glue to a toilet paper tube.  Add embellishments like buttons, feathers, pompoms and even a toothpick sword if you like.  It’s a bit tricky to find the PDF — click on “stats” to find it.

Nutcracker-toilet tube roll

Learn Create Love has a printable nutcracker that kids can color and then cut out and assemble.

nutcracker printable

Playground Park Bench has a rather elaborate Nutcracker and mouse battle tic tac toe game made of clothespins that you can make with the kids.  I’m not sure we need to buy all the parts and do it that fancy, but I’m thinking we could use some clothespins and craft supplies around the house to make our own kid versions.

Nutcracker-Game-Playing-Tic-Tac-Toe-with-Toy-Soldiers

Schooling a Monkey shows how to make cute little craft stick nutcracker characters.

Nutcracker-Craft-popsicle-stick

Crafty Morning uses popsicle sticks, paper and clothespins to make some very cute kid-made nutcrackers.

nutcracker-christmas-craft-for-kids

Glued to My Crafts has a sweet paper plate nutcracker for kids to craft.

nutcracker-paper-plate

Fireflies and Mudpies shows how to make a toy soldier ornament with craft sticks and paint.

nutcracker-Toy-Soldier-Ornament

And I am in love with these darling nutcracker portraits shared on smArt Class.

nutcracker-drawings

She also shared this video to show kids how to draw their own nutcrackers.


Deviant Art’s CyberDrone has a printable nutcracker cube kids can have fun assembling, too.

nutcracker_cube

Lastly, Mom Junction has an assortment of Nutcracker themed coloring pages to print out for the kids to color.

nutcracker-coloring-pages

And with that, I’m off to do a billion nutcracker crafts with a happy little girl.


Leave a comment

Filed under crafts, neat stuff elsewhere, printables

Make a Daisy Chain or Flower Crown!

Do you know how to make a daisy chain or flower crown?  It’s incredibly easy and so fun!

There are several classic ways to make a flower crown:  the slit stem, braided, and woven.  Here are the simple instructions to do all three.

Method #1 — Split stem

dandelion-crown

  1. Trim flower stems to about 4 inches. Use a fingernail to make a small slit in the bottom half of each stem.
  2. Thread one stem through the slit in the next, creating a chain. Continue, adding flowers to reach desired length. To form a circle or crown, make a second slit in the stem of the first flower, and slip the last flower through it.

If you like visuals, here’s a quick video that shows the split stem method of making a daisy chain.

Method #2 — Braided

This method makes a more tightly knit flower crown or daisy chain, and is a bit more durable.  Simply braid three stems together for about an inch, and then add in more flowers to the braid.

how to make daisy chain crowns

Creative Green Living has a lovely step-by-step tutorial with lots of photos.


Method #3 — Woven

daisy chain

This is another easy way to make a flower crown.  Simply wrap one stem around the flower of the next, pull both stems to the side, and add another.  Wrap that stem around the first two, pull all three stems to the side, and continue.  As stems end, they will be woven into the line well enough to stay put.  To finish, wrap the last flower around the first flower and the end of the chain, forming a circle.

And here’s a short video that shows the woven method of making a flower crown.

Our Annalee (Rhiannon Lee, known these days as Rhia) also made a simple rose crown years ago and shared the instructions here on Magical Childhood.

rose crown

Have fun!


1 Comment

Filed under crafts

Our Craft Sheet

sheet1

Those who have been reading Magical Childhood for a while know that I often recommend sheet painting.  It’s even one of the first crafts I put up on the original Magical Childhood site.

We have been using an old white bed sheet for crafts and sheet painting for over a dozen years now. 

sh9

In the summer time, we hang it on the clothes line and the kids use paint to decorate it. 

sh6

Sometimes we put it on the ground and they decorate it with their feet. 

sh2

Sometimes it’s washable paint, sometimes not. 

sh10

The sheet looks different every year and every project. 

sh7

In the winter time and on rainy days, the sheet is our art tablecloth.  It doesn’t matter how messy or staining an activity is, because if it stains the craft sheet it just adds more character and another memory. 

sh3

I love my craft sheet and it makes me smile every time I spread it on the table or hang it on the line for another round of staining. 

sh4

It’s so amazing to look at little one year old Fiona using it now and remembering when her teenage sisters were making those stains. 

sh5

You can use any old flat bed sheet for an art cloth or pick one up for a dollar or two from a thrift store. 

I highly recommend starting your own. 

You’ll never find another bunch of stains to make you smile more.  🙂

sh8


9 Comments

Filed under crafts, happy stuff

Colorful Shaving Cream Fun!

I’m very sorry for my long absence! 

Five year-old Alex had a tonsillectomy and adenoidectomy last week and the recovery has been really hard on him.  We’ve also been out of town to celebrate my birthday and to meet with doctors at the Mayo for my husband to get a long-overdue new hip.  Also, a friend (and magical mama to six kids) died suddenly (click here if you would like to help the family), and I just didn’t feel up to writing for a long time.

But times like these mean we need more magic for our kids (and us), so I’m back on my feet to do my best.

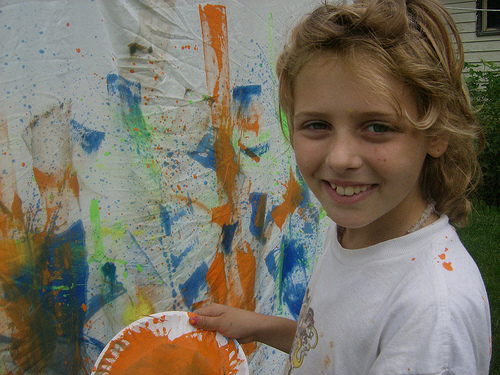
This morning, I got out the shaving cream and food coloring for Alex to have a bit of messy fun. 

I sprayed his name in shaving cream and then had him smooth it out, then dropped about 3 drops of each color (red, blue, green, red) on various parts. 

He used his finger to swirl the colors, then used chopsticks and spoons, making colorful mountains and experimenting with lots of color mixing.

It was a huge hit!  His brother joined in the fun for a while too, and then helped clean it all up. 

I hear it’s good for wood tables, too.  I have no proof, but our 50 year-old wood table can pretty much handle anything at this point.  🙂

This craft works marvelously well in the bath, too, of course!

Hug your kiddos, count your blessings, and make the most of every second that you get with these amazing little people (and the amazing big ones, too).
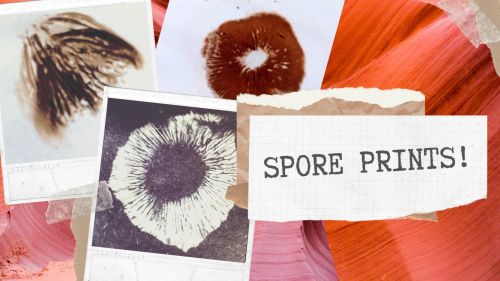
3 Comments

Filed under crafts

Colorful Baking Soda Busywork

Here’s a fun way to occupy the kids in a bubbly, colorful way.

Do some baking soda and vinegar experiments but add color!

You’ll need:

  • A box of baking soda per child (ours cost about .50 a box and we bought a bunch)
  • 1-2 cups of white vinegar (generally under a dollar)
  • Food coloring
  • One cake pan or similar container per child
  • Muffin tin (regular size if two kids will be sharing it the way ours did, or mini muffin size would be enough for one child — an ice cube tray would work too)
  • Eye droppers or pipettes (one per child)

Instructions:

  1. Fill the muffin tins half full with the vinegar, and tint each cup with a different color of food coloring.  We usually leave one clear so kids can mix a custom color.
  2. Pour one box of baking soda into a cake pan for each child.  Smooth out.
  3. Spread an old towel on the table (or do it outside) and put the cake pan(s), muffin tin and eye droppers on it.
  4. Show kids how to squeeze the eye droppers in the colored vinegar to fill them up, then have them drizzle and drop it on the baking soda to watch what happens.

This large amount of baking soda means that kids can happily do the activity for a good long time, making this a perfect activity for while you’re making lunch or taking a break. 

Kids can also experiment with things like pushing the eye dropper under the baking soda and then squeezing (tiny volcanoes!) and so on.

Science info:  Want to know why baking soda and vinegar bubble up?  Explain to the kids that carbon dioxide is released when acids (like vinegar) and bases (like baking soda) combine and react to each other.  If they want to do more colorful science to learn about acids and bases, consider the purple cabbage pH experiment (our family’s all time favorite science experiment).  You can also just bake something!  People make cakes and breads rise by either using yeast or relying on the same reaction with ingredients like baking soda and buttermilk. 

Have fun!

4 Comments

Filed under activities, crafts

Easy Velcro Blocks

Here’s a fun and inexpensive way to make some neat building blocks for little ones.

Our fabulous friend Jan, a local Head Start teacher, came up with this idea. She purchased a couple of $1 bags of foam blocks from Target and then purchased some adhesive velcro. She cut the velcro into tiny squares and affixed it to most sides of the blocks.

Our boys played with the new sticky blocks yesterday and had great fun.

You could also use the idea with wooden blocks or any number of household objects.

Fun!

2 Comments

Filed under activities, crafts

Easy Puffy Paint!

I’ve seen recipes for homemade puffy paint many times over the years, but I never took the time to make it with the kids until today.

What a shame I waited this long!

The kids had a blast and developed lots of ways to use it.

Even Harry Potter crests and pendants!


The original instructions were to mix one tablespoon self-rising flour, one tablespoon salt, food coloring and enough water to make a paste, once for each color.

Since I made up little cups for four different children (life is too short to listen to “Mom, Alex mixed all the colors into brown!” and “Hey!  Victoria used all the red up!” all day!), I soon realized that it made much more sense to just mix up:

  • One part self rising flour
  • One part salt
  • Enough water to make a paste

and THEN divide it into muffin tins or ice cube trays and add food coloring!

Either way, all you do is give the kids Q-tips or paint brushes and instruct them to dab it on cardboard.

We used recycled Priority Mail boxes for our canvases, cut into small squares.  You want a nice sturdy canvas.

When the picture is finished, microwave it for about 10 seconds (we did 5 second intervals and occasionally needed longer for really thick and wet paintings).

All four kids had a blast using this stuff and they used it off and on the whole day and into the night.

28 Comments

Filed under crafts